Thursday, November 7, 2024
How to build an 8x12 shed that’s affordable and stylish

Alright, you're ready to conquer the clutter and finally have a place for all your stuff. An 8x12 shed is a fantastic option â€" big enough to be useful, but not so overwhelming that you'll feel like you're building a tiny house. And the best part? You can do it without breaking the bank!
Let's break this down, one step at a time, and make this shed project feel like a fun adventure, not a daunting task.
Planning is Key: Don't Skip the Brainstorming
First things first: before you even think about hammering a nail, grab a notebook (or open a document on your computer â€" we're not judging!) and start sketching out your shed dreams.
What will you use it for? Storage for tools, a workshop, a mini-greenhouse? Knowing the purpose will guide everything from the design to the materials you choose.
Where will it go? Consider your yard’s layout, sunlight, access, and any potential obstacles.
What style do you envision? Do you want a classic, traditional shed, a modern minimalist design, or something more whimsical? Think about the overall style of your home and how the shed should blend in.
Building a Budget: Making Smart Choices
Budgeting is where many projects go off the rails. So, let's get realistic about what we're working with.
DIY vs. Hiring Help: Are you comfortable building a shed yourself, or do you want to bring in a contractor? Be honest about your skill level and the amount of time you can commit. DIY will save money, but you’ll need to do more research and potentially buy tools.
Material Choices: This is where you can make big savings. Pine is affordable, but not as weather-resistant as cedar or redwood. If you want the look of painted wood, you can get away with a cheaper wood and just invest in a good quality exterior paint.
Foundation Options: A concrete slab is the most durable, but can be expensive. A gravel pad is more affordable, but less sturdy. Consider your soil conditions and the weight of your shed.
Roofing: Asphalt shingles are budget-friendly, but metal roofing is more durable and can actually save you money on your energy bills over time.
Windows and Doors: Standard sizes tend to be more affordable than custom. Consider using recycled windows or doors â€" they're eco-friendly and often a bargain.
Finding the Right Materials: Where to Shop
Now it's time to get shopping!
Big Box Stores: Home Depot and Lowe's offer a decent selection of shed materials and often have sales.
Local Lumber Yards: They might have better prices on lumber and can offer expert advice.
Online Retailers: Websites like Amazon and eBay can have great deals, but shipping costs can add up.
Used Material Stores: Check out Habitat for Humanity ReStore or similar places â€" you can find great deals on doors, windows, and even siding.
Getting Started: Laying the Foundation
Choosing a Foundation: A concrete slab is the most durable, but a gravel pad is more affordable. Consider your soil conditions and the weight of your shed.
Leveling the Ground: Use a level to make sure your foundation is perfectly level.
Creating the Forms: For a concrete slab, you'll need to create forms to hold the concrete. There are plenty of tutorials online.
Pouring the Concrete: Order ready-mix concrete from your local supplier, or mix your own concrete if you prefer.
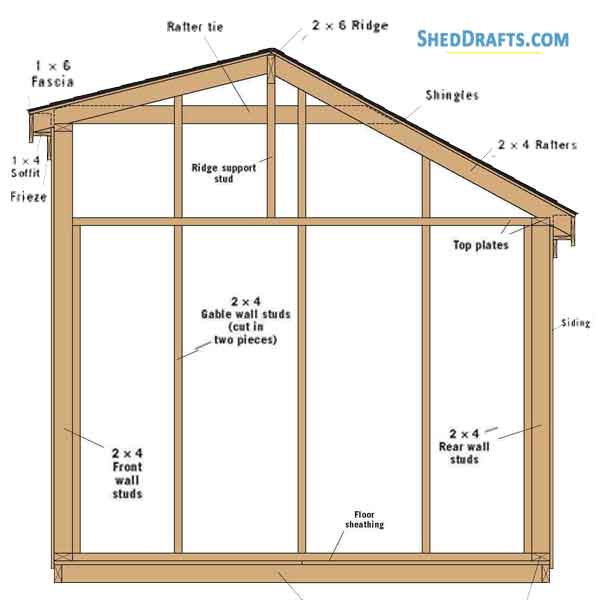
Framing the Shed: The Skeleton of Your Project
Cutting the Lumber: Make sure your lumber is cut to the correct sizes before you start assembling the frame.
Building the Walls: Start with the floor joists, then add the wall studs. Use a level and a tape measure to make sure everything is square.
Adding the Roof: Use rafters to create the roof structure. Make sure you have enough pitch for proper drainage.
Adding the Finishing Touches: Making It Your Own
Siding: Use pressure-treated lumber for the base, and then choose your siding material â€" cedar, redwood, vinyl, or composite.
Roofing: Asphalt shingles are affordable, but metal roofing is more durable.
Windows and Doors: Choose windows and doors that fit your style and budget.
Painting or Staining: Protect your shed with a quality paint or stain.
Don't Forget the Details!
Electrical: If you're planning to use electricity in your shed, you'll need to run wiring and install a circuit breaker.
Flooring: Choose flooring that's durable and easy to clean.
Ventilation: Make sure your shed has adequate ventilation to prevent moisture build-up.
Insulation: Consider adding insulation to your shed, especially if you plan to use it in extreme weather conditions.
Safety First!
Work in a well-ventilated area.
Always wear eye protection and a dust mask when working with power tools.
Use a ladder safely.
Follow the manufacturer's instructions for all tools and materials.
Tips for Making Your Shed Stylish
Now, let's bring some personality to this practical space!
Paint it bold: Don't be afraid to experiment with color! A bright, eye-catching shed can be a real statement.
Add some greenery: Vines climbing up the walls or flower boxes bring a touch of nature.
Incorporate salvaged materials: Reclaimed wood for siding or a vintage door adds character and saves money.
Install a skylight: Let natural light flood in for a brighter and more welcoming space.
Don’t forget the lighting: Outdoor string lights or a lantern add charm and ambiance.
The Finishing Touches
Once you've finished building your shed, it's time to make it truly your own! Add shelves, workbenches, storage bins, and any other organization solutions you need. Decorate it with your favorite tools, artwork, or whatever makes you happy.
Remember, building a shed is a journey, not a race. Enjoy the process, learn as you go, and take pride in your accomplishment! And don't forget to share your shed with the world â€" we all love seeing what creative DIYers are up to!